
Monday, December 10, 2012
Friday, November 30, 2012
OMG I've been slacking!!
Hey guys!! So sorry I haven't updated in a while! My town was hit by Hurricane Sandy so I was out of power for a while, and then I was just being lazy about updating. I've been making videos for my YouTube channel though, so you can keep up with me there.
Anyway, here are some photos of my most recent manicures. If you want a tutorial on any, please let me know.
Thanks for reading! See you soon!


Anyway, here are some photos of my most recent manicures. If you want a tutorial on any, please let me know.
Thanks for reading! See you soon!
Thursday, October 18, 2012
Breast Cancer Awareness Ribbon Nail Art Tutorial
Hey guys! I've got another pink nail art tutorial for Breast Cancer Awareness Month. Today, I did a seed bead breast cancer ribbon.
Here's what you'll need:
 I used one coat of Nutra Nail Bulletproof Strengthening (I cannot stress how much I LOVE this product), followed by one coast of Seche Clear base coat. After it was dry, I applied two coats of a hot pink polish - I used Avon Speed Dry in 'Strawberry'. I allowed my base color to dry COMPLETELY.
Once my polish was dry, I used my dotting tool dipped into some cheapo clear polish (I used a Revlon one I've had for a while). With my dotting tool, I drew a ribbon shape quickly and then basically dumped on some light pink seed beads (8 little bottles of different colors for $1 and Dollar Tree). It came out really messy but I was able to clean it up and make it look like a breast cancer ribbon! I let the ribbon design dry for a while, probably about 20 minutes, then topped with Seche Vite top coat.
Here's the finished product:
 And a closeup of the ribbon: (sorry for the glare)


I love the way it came out! It may come off in a few days but that's OK, it's for a good cause!
I hope you guys enjoyed this tutorial and will give this design a try!
Thanks for reading/watching! See you all next time :)
Here's what you'll need:

Once my polish was dry, I used my dotting tool dipped into some cheapo clear polish (I used a Revlon one I've had for a while). With my dotting tool, I drew a ribbon shape quickly and then basically dumped on some light pink seed beads (8 little bottles of different colors for $1 and Dollar Tree). It came out really messy but I was able to clean it up and make it look like a breast cancer ribbon! I let the ribbon design dry for a while, probably about 20 minutes, then topped with Seche Vite top coat.
Here's the finished product:


I hope you guys enjoyed this tutorial and will give this design a try!
Thanks for reading/watching! See you all next time :)
Tuesday, October 16, 2012
Haul/Swatches Combo #2! Dollar Tree & Rite Aid
Hey guys! Another weekend has passed and of course it was another weekend of shopping! I went to Rite Aid and Dollar Tree and bought a few new polishes. I actually went to a different Dollar Tree than the one I usually go to, and I'm SO glad I did because they had a ton of different stuff!
Swatch photos are at the bottom of the post.
Here's the haul video:
And the colors: (swatches at the bottom of the post)
 Left: Wet n Wild 'Sunny Side Up', a light/medium orange creme finish...almost the color of a creamsicle! Right: Wet n Wild 'Rain Check', a shimmery bluish-purplish-gray. Just gorgeous. Both were 99 cents each at Rite Aid.
 Left: Wet n Wild 'Blue Moon', a very dark blue with a shimmer of blue and almost green. It's probably my favorite one I picked up this weekend and the photos/video do NOT do it justice. (99 cents at Rite Aid). Right: Sally Hansen Complete Salon Manicure 'Himalayan Blue', a lovely sky blue creme finish. I got this one at Dollar Tree ($1). I've seen these in other stores and I could have sworn I saw it for $1.99 but one of my Youtube subscribers told me they retail in some places for $8! So my $1 purchase was definitely a steal!
 Left: Sinful Colors striper 'Flower Girl', a gold glitter nail art striper ($1.99, Rite Aid). Right: Color Mates striper, 'Red'...creative! Shall I describe? It's red LOL ($1, Dollar Tree)
 Left: Color Mates striper 'Purple Shimmer'...again with the creativity! It's a shimmery purple lol. Center: Color Mates striper 'Glitter Lites', a silver glitter with both large and small glitters...so pretty! Right: Color Mates striper 'Opal Glitter', basically a clear polish with some gold-tinted glitter in it. It's a very subtle glitter and looks gorgeous over my current manicure (see my previous post). All of these were $1 at Dollar Tree.
 I also picked up these little seed beads for nail art. I've seen these all over Youtube but never saw any in my local Dollar Tree...but the other local one I went to had a ton of different designs! There were little sequins and such, but I chose the seed beads to start out with. I've never used anything like these for nail art so I'm pretty excited! ($1, Dollar Tree)
And the swatches:
 Thumb: Color Mates striper 'Red' & Sinful Colors striper 'Flower Girl'; Index: Sally Hansen Complete Salon Manicure 'Himalayan Blue'; Middle: Wet n Wild 'Blue Moon'; Ring: Wet n Wild 'Rain Check'; Pinky: Wet n Wild 'Sunny Side Up'
 Thumb: Color Mates striper 'Purple Shimmer' & Color Mates striper 'Glitter Lites'; Index: Color Mates striper 'Opal Glitter'
That's all I've got for you today, stay tuned for my next pink nail art tutorial for Breast Cancer Awareness month - I've got one or two more pink manicures before I do my Halloween stuff!
Thanks for reading&watching, I hope you enjoyed! I'll see you guys next time!
Swatch photos are at the bottom of the post.
Here's the haul video:
And the colors: (swatches at the bottom of the post)


And the swatches:


That's all I've got for you today, stay tuned for my next pink nail art tutorial for Breast Cancer Awareness month - I've got one or two more pink manicures before I do my Halloween stuff!
Thanks for reading&watching, I hope you enjoyed! I'll see you guys next time!
Latest manicure! Simple pink with glitter accent (Breast Cancer Awareness #2)
Hey guys! Just wanted to share a quick manicure with you today. I started this manicure with one coat of Nutra Nail Bulletproof Strengthening Formula. Then I added one coat of my Seche Clear basecoat followed by two coats of Avon's 'Retro Rose'. Once that was totally dry, I painted some glitter (Colormates striper in 'Opal Glitter') on my accent nail. I finished with my Seche Vite top coat. It came out looking so cute! I love this new glitter I bought!
I've been working on some ideas for more pink nail art tutorials for Breast Cancer Awareness month. I just bought some little seed beads so I'll be experimenting with those. Also, look out for my latest haul which I put on YouTube yesterday and I'll probably post up here tonight.
Thanks for reading, I'll see you guys next time!
Friday, October 12, 2012
Water Marble Tutorial - Pink for Breast Cancer Awareness Month
Hey guys! I have the first of my series of pink manicures for you today! As you may know, October is Breast Cancer Awareness Month. So I'm going to be doing a few pink nail designs until Halloween. Today I've got a pink swirl water marble tutorial. I actually did it twice, thinking I would choose one or the other to put up on Youtube, but I decided I liked them both so I just put up both.
Here's take one:
And take two:
And the finished product:

Stay tuned for more pink nail art tutorials! I hope you enjoyed, thanks for reading/watching!
See you next time!
Here's take one:
And take two:
And the finished product:

Stay tuned for more pink nail art tutorials! I hope you enjoyed, thanks for reading/watching!
See you next time!
Wednesday, October 10, 2012
Haul/swatches combo!
Hey guys! I spent all weekend shopping and, of course, I had to pick up a few new polishes!
Here's the haul/swatch video. I'd suggest you watch it because (silly me) I forgot to take photos of the swatches! Shame! But I did take pics of the polishes which I'll include in this post as well.
And the colors:
 Left: L.A. Colors 'Treasure Island', a sheer teal base with blue and green glitter. ($1, Dollar Tree) Right: Sally Hansen Hard As Nails 'Rock Bottom', a shimmery purple. ($1.92, Wal-Mart)
 Left: Wet n Wild 'Caribbean Frost', a shimmery teal. (99 cents, Shop Rite--yes, the grocery store!) Right: Wet n Wild 'Tickled Pink', a soft baby pink. (99 cents, Rite Aid)
 Left: Sinful Colors 'A Slice To Go', a hot pink nail art striper. ($1.99, Rite Aid) Right: Sinful Colors 'Love Me', a clear polish striper loaded with pink, purple, and turquoise glitter. ($1.99, Rite Aid)
That's all for now, but stay tuned for more hauls, swatches, and nail art...I've already bought two more polishes this week and the weekend is coming up so of course there will be more LOL
Thanks for watching/reading! I hope you enjoyed :) See you next time!
Here's the haul/swatch video. I'd suggest you watch it because (silly me) I forgot to take photos of the swatches! Shame! But I did take pics of the polishes which I'll include in this post as well.
And the colors:


That's all for now, but stay tuned for more hauls, swatches, and nail art...I've already bought two more polishes this week and the weekend is coming up so of course there will be more LOL
Thanks for watching/reading! I hope you enjoyed :) See you next time!
Tuesday, October 9, 2012
Latest manicure! Finally tried a French!
Hey guys! I wanted to share my latest manicure...I finally decided to try a French manicure! I've tried before with terrible results--I can never get a good tip line! I've tried freehand,scotch tape, stripers...nothing worked for me. So when I saw some French tip stickers (photo below) in Rite-Aid, I decided to try them out. I'm really pleased with the results.
First up, here's what I used:

Nailene Perfect Tips. 96 stickers for $1.99 at Rite Aid, but they should be available in most drugstores.
 Left: Sinful Colors 'Snow Me White', Center: Sally Hansen Hard As Nails 'Rock Bottom', Right: Sinful Colors striper 'Love Me'
I started off with a basecoat (Seche Clear) on my nails. Once that was totally dry, I applied the stickers. The trick to this is to take some of the tackiness off the stickers before you put it on your nail, otherwise it will pull up the basecoat when you peel the sticker off. To take the tackiness off, I just stuck the sticker on the back of my hand 2 or 3 times before applying to my nails. Make sure you press the edges of the stickers down into the crease of the side of your nailbed.
Once all of the stickers were on, (I did one hand at a time starting with my dominant hand in case I really screwed up and decided to give up LOL) so once the stickers were on, I used my white polish (see photo above) to paint my tips. Make sure you cover your nail tip all the way to the edges. Allow the tips to dry completely before removing the stickers.
Once I had my white tips, I applied an old Revlon top coat that I had which had a bit of pink in it (I used it one too many times over still-tacky pink polish). You can use a sheer pink or nude polish if you'd like (I'm dying to pick up Essie's 'Mademoiselle' for this exact reason!), or you can just use a clear coat.
After this was all done, I decided to do a little design on the accent nail. I had just bought a glitter striper so I decided to use that and dot on a small heart. I just dragged the glitter striper across the nail tip line and allowed it to dry. Since the glitter was purple-y, I made my heart using a purple polish. I used a dotting tool to make the two top dots of the heart, then dragged diagonally until they met in a heart shape. (you'll see in photos below)
Finally, I finished off with Seche Vite top coat.
I really love how it came out and I'll be fine-tuning it in a few weeks.
My French manicure!
 French manicure with accent nail design
 Accent nail design close-up. Glitter stripe in Sinful Colors 'Love Me', heart in Sally Hansen 'Rock Bottom'.
That's it for today! I hope you guys enjoyed and if you give this a try, or if you have any tips for making French manicures easier, let me know!
Thanks for reading, see you next time!
First up, here's what I used:

Nailene Perfect Tips. 96 stickers for $1.99 at Rite Aid, but they should be available in most drugstores.

I started off with a basecoat (Seche Clear) on my nails. Once that was totally dry, I applied the stickers. The trick to this is to take some of the tackiness off the stickers before you put it on your nail, otherwise it will pull up the basecoat when you peel the sticker off. To take the tackiness off, I just stuck the sticker on the back of my hand 2 or 3 times before applying to my nails. Make sure you press the edges of the stickers down into the crease of the side of your nailbed.
Once all of the stickers were on, (I did one hand at a time starting with my dominant hand in case I really screwed up and decided to give up LOL) so once the stickers were on, I used my white polish (see photo above) to paint my tips. Make sure you cover your nail tip all the way to the edges. Allow the tips to dry completely before removing the stickers.
Once I had my white tips, I applied an old Revlon top coat that I had which had a bit of pink in it (I used it one too many times over still-tacky pink polish). You can use a sheer pink or nude polish if you'd like (I'm dying to pick up Essie's 'Mademoiselle' for this exact reason!), or you can just use a clear coat.
After this was all done, I decided to do a little design on the accent nail. I had just bought a glitter striper so I decided to use that and dot on a small heart. I just dragged the glitter striper across the nail tip line and allowed it to dry. Since the glitter was purple-y, I made my heart using a purple polish. I used a dotting tool to make the two top dots of the heart, then dragged diagonally until they met in a heart shape. (you'll see in photos below)
Finally, I finished off with Seche Vite top coat.
I really love how it came out and I'll be fine-tuning it in a few weeks.
My French manicure!


That's it for today! I hope you guys enjoyed and if you give this a try, or if you have any tips for making French manicures easier, let me know!
Thanks for reading, see you next time!
Monday, October 8, 2012
Swatch alert!! Testing my Dollar Tree polishes!
Hey guys! Just a quick swatch post for you today. I tested out my new Dollar Tree polishes and was pretty happy with the results! They were a bit thin but I applied 3 thin coats and they dried really quickly in between and I got full coverage with the 3 thin coats.
 Thumb: Sally Hansen Hard As Nails in 'Sheer Vanilla'
Index: same as thumb for the base, stripes were made by using Color Mates striper in 'Cocoa' (You may have seen this nail in my last post "The Mismatched Manicure")
Middle: Color Mates in 'Metallic Blue'
Ring: L.A. Colors in 'Phenomena'
Pinky: L.A. Colors in 'Circuits'

Here's the swatch video:
And here's the photos:

Index: same as thumb for the base, stripes were made by using Color Mates striper in 'Cocoa' (You may have seen this nail in my last post "The Mismatched Manicure")
Middle: Color Mates in 'Metallic Blue'
Ring: L.A. Colors in 'Phenomena'
Pinky: L.A. Colors in 'Circuits'

Both of these are Sally Hansen Hard As Nails Xtreme Wear in 'Teal-y Cool'. On the left, I applied 3 coats of the teal glitter over 3 coats of Sally Hansen 'Sheer Vanilla', but when I started applying the glitter polish, the base color started peeling up. You can see that in the center of the nail. But, I tried that again after allowing the base color to dry COMPLETELY and it didn't peel up and came out looking great. On the right is just 3 coats of the teal glitter.
That's all for today BUT I have another haul coming up. I did some shopping over the weekend and picked up a few new polishes, of course!
Thanks for reading! See you guys next time!
Friday, October 5, 2012
Latest manicure! "The Mismatched Manicure"
Hey guys! I was doing some swatches tonight and I decided to do a funky little design on my nails because I liked how one of the colors I tried came out. So, here's my funky design!

I started off with 3 coats of Sally Hansen Hard as Nails 'Sheer Vanilla' on all of my nails.
On my pinky I added gold glitter polish (Wet n Wild 'The Gold & The Beautiful').
On my ring finger, I dotted on some brown dots (China Glaze 'Mahogany Magic'). Some dots I made smaller than others by dotting on paper first before I went to the nail. Once the large brown dots were dry I dotted on some teal (Finger Paints 'Go Van Gogh') in the center of the large brown dots. I also added small teal dots to the empty spaces on my nail.
On my middle finger, I added two coats of a teal glitter (Sally Hansen 'Teal-y Cool'). It didn't come out quite as teal as I'd hoped, it looks almost like an icy blue.
For my index finger, I used my brown nail art striper (Color Mates 'Cocoa') to draw a basket-weave sort of design by drawing lines diagonally from left to right, then diagonally from right to left. This was the nail that I swatched to test my striper and it inspired this design. I didn't want to take it off!
I left my thumb plain with just the base color. Finally, I topped it all off with Seche Vite top coat once my nails were COMPLETELY dry.
If you like to mix up your manicures every once in a while, give this a try! Use colors that look nice together on a neutral base to really let the design stand out. Don't be afraid to try polka dots with stripes! Matchy-matchy isn't the only way!
I hope you guys enjoyed and I hope you'll give it a try! If you do, please post a photo of it in the comments! I'd love to see your creativity!!
Thanks for reading! See you next time!
Thursday, October 4, 2012
Dollar Tree haul!!! Nail polish for $1.00!!!
Hey guys! I have another haul for you today! I stopped into my local Dollar Tree and I was so pleasantly surprised to find a TON of nail polish in the beauty aisle! I spent $5 and got 6 new polishes...SO worth it since the regular price of Orly and China Glaze is at least $6 each. And I won't feel bad tossing them if they're junk. Anyway, here's the haul:
Photos:
 L.A. Colors Color Craze. Left: 'Circuits', a creme finish black, right: 'Phenomena', a beautiful fuschia color. This photo makes it look more pink than fuschia so I took a closer picture, below.
 You can definitely see the fuschia color in this one.
 Both of these are Color Mates. Left: 'Metallic Blue' (creative, huh? Do I even need to describe this one? LOL), right: nail art striper in 'Cocoa', a medium brown perfect for fall.
 Sally Hansen Hard As Nails. These were in a 2-pack for $1...can't get much better than that! Left: 'Sheer Vanilla', a creamy beige; right: 'Teal-y Cool', a GORGEOUS teal-ish green-ish glitter polish. It's got some teal, green, gold, and turquoise glitter in it and it's absolutely my favorite one I bought today. I took another photo with no flash (below) so you can see the glitter.
 Here you can see the gold, teal, and turqouise glitter. In the bottle, it looks like a sheer greenish-teal base so I'm curious to do some swatching and see what it really looks like!
That's all for now...hope you all enjoyed! See you next time!
Photos:


That's all for now...hope you all enjoyed! See you next time!
Wednesday, October 3, 2012
Swatch Alert! Testing my new colors!
Hey guys! I finally got the swatch post together (although I don't know what took me so long--it's a relatively short post!)
If you read my latest haul post or watched the haul video, you'll know that I recently bought six new polishes! Since that post, I also bought two more, which were on sale at my local grocery store (Shop Rite). I swatched those as well as all of my colors from my Sallybeauty.com haul.
So, here we go!
First off, here's the swatch video if you're interested:
Okay, now on to the photos! My two new colors, from Wet N Wild, were on sale for $1.99 each at my grocery store.
 Both are Wet N Wild Fast Dry. Left: 'The Gold & the Beautiful', a clear polish LOADED with gold glitter, right: '9.0.2.1.Orange' a sheer orange with goldish-orange glitter.
Swatches:
 Thumb to pinky: Orly 'Bailamos', China Glaze 'Cha Cha Cha', China Glaze 'Exotic Encounters'(this was used as a comparison to see the color difference between that and the next one-they look almost the same in the bottle but you can tell the difference on the finger.), Finger Paints 'Go Van Gogh', and Finger Paints 'Sketch N Etch'.
 Pinky to thumb: Wet N Wild '9.0.2.1.Orange', Wet N Wild 'The Gold & The Beautiful', China Glaze 'Hook and Line', China Glaze 'Mahogany Magic', and China Glaze 'Mahogany Magic' topped with Wet N Wild 'The Gold & the Beautiful'. I think the thumb is my favorite look I tested. It's SO glittery and gorgeous!
That's it for now...hope you guys enjoyed! See you next time!
If you read my latest haul post or watched the haul video, you'll know that I recently bought six new polishes! Since that post, I also bought two more, which were on sale at my local grocery store (Shop Rite). I swatched those as well as all of my colors from my Sallybeauty.com haul.
So, here we go!
First off, here's the swatch video if you're interested:
Okay, now on to the photos! My two new colors, from Wet N Wild, were on sale for $1.99 each at my grocery store.

Swatches:


That's it for now...hope you guys enjoyed! See you next time!
Monday, October 1, 2012
Latest manicure! And swatches coming soon!
Hey guys! I just wanted to show you my latest manicure...it's so simple and pretty!
This manicure is started, of course, with my Seche Clear base coat, followed by two coats of Orly's 'Bailamos'. For my accent nails, I used a small dotting tool to make polka dots using Sinful Colors 'Snow Me White'. I allowed that to dry and then painted one coat of Orly's 'Shine On Crazy Diamond', a glitter polish. I topped it all (after it was completely dry) with Seche Vite top coat. It's so simple but came out so cute!!
Also, be on the lookout for my next post, swatches of my new colors! I'm super excited to put it together for you!
Hope you guys enjoy! Thanks for reading & see you all soon!
Friday, September 28, 2012
Sallybeauty.com Haul!!
Hey guys! I just got my package from Sally Beauty (I ordered online from here) and I'm so excited to try out all my new stuff! I'm so glad I decided to order when I did, because they were having a special on almost everything I bought! I ended up getting 6 (yes, six!) new polishes, some new tools, and a cute little wristlet! My order before all the discounts and coupons came to $38.75, and after all the deals, it was only $20.53 ! So without further ado, here's my haul!
For those you who would rather not read a long post, check out my haul video on my YouTube page:
First up: The Polishes!!
 From left to right: Orly 'Bailamos', Finger Paints 'Sketch N Etch', Finger Paints 'Go Van Gogh', China Glaze 'Cha Cha Cha', China Glaze 'Hook and Line', China Glaze 'Mahogany Magic'
I really lucked out on the sales on polish! The Orly was on sale for $4.50, The Finger Paints were buy one get one free (the one was $4.49), and the last two China Glaze were both on clearance for $1.50--and there was a special 50% off red tag clearance sale so there were only 75 cents each!!
Now, the Finger Paints deal was not listed on the site. I went to RetailMeNot, my favorite place to find coupon codes, and I saw the deal they were running with a special coupon code. I had to take advantage of that! If you don't already, I would suggest searching for coupon codes for any purchase you make online, because you never know if you can save money! You'll be much more satisfied with your purchase if you got a great deal.
So I decided that the picture above doesn't really capture the true colors of the polishes, and I took one with flash that I feel definitely looks truer to the actual colors.
 Much better. You can see the shimmer now.
Some close-ups of the colors:
 Left: Orly's 'Bailamos', a turquoise with a greenish shimmer, right: Finger Paints 'Sketch N Etch', a forest green with an almost multicolored shimmer. It looks golden at first but if you look closely it almost looks holographic.
 Left: Finger Paints 'Go Van Gogh', a bluish-teal cream finish, right: China Glaze's 'Cha Cha Cha', a medium green with a golden shimmer.
 Left: China Glaze's 'Hook And Line', a silvery shimmery grey, right: China Glaze's 'Mahogany Magic', a beautiful brown (mahogany, honestly) cream finish. These two are from The Hunger Games Collection which has been out for quite a while and that's probably why they were so cheap!
On to the rest!
 My first dotting tool! It's double sided with the other end being a detailing brush. The brand is "It's So Easy" Double Up Nail Art Brushes. I picked this up for $3.99 which I think is pretty cheap for a double sided tool. I'm excited to try this out and see what I can do with it!
 Beauty Secrets Cuticle Remover/Pusher. I have really terrible cuticles and I've been looking for something to take care of them. I'm curious to see if this will work for me. It was only $2.29 so I figured, why not try it out?
 I'm so excited to use these pointed cotton swabs to remove my excess polish when I do my next manicure. I hope they work better for me than regular cotton swabs do, because I always end up getting overzealous with the regular swab and either smudge the side of my polish or can't get close enough to get it all off. I'm hoping the point will help me out. These are Nail Tees, and the pack of 120 swabs was only $2.99. I also got a new bottle of pure acetone because I was running low. $1.79 on that one.
 The cutest wristlet! It's black, blue, and pink snake print. Inside it has a zipper compartment and it's just big enough to hold my phone, a small cigarette case that I use to hold my cash and license when I go out, and some lip gloss and gum! Perfect for just the essentials. This was originally $16.99, on clearance for $7.99, and with the red tag 50% off, I got it for only $3.99! Super cute and affordable and I'll get a lot of use out of it!
On top of the Finger Paints BOGO and the red tag clearance, I also used a $5 off any purchase coupon I had, and just to see if I could, I tried to use another coupon code I found at RetailMeNot for $5 off $25 or more--and it worked! I wasn't sure if they would honor that because I'd already used a $5 off coupon, but they accepted it so there's some knowledge for ya!
They also sent me two more coupons for $5 off any purchase of $25 or more. They're always trying to get you to buy more, and it always works! I am so pleased with my purchases and I can't wait to try everything out...stay tuned for videos and photos of my experimenting!
Thanks for reading/watching! I'll see you guys soon!
For those you who would rather not read a long post, check out my haul video on my YouTube page:
First up: The Polishes!!

I really lucked out on the sales on polish! The Orly was on sale for $4.50, The Finger Paints were buy one get one free (the one was $4.49), and the last two China Glaze were both on clearance for $1.50--and there was a special 50% off red tag clearance sale so there were only 75 cents each!!
Now, the Finger Paints deal was not listed on the site. I went to RetailMeNot, my favorite place to find coupon codes, and I saw the deal they were running with a special coupon code. I had to take advantage of that! If you don't already, I would suggest searching for coupon codes for any purchase you make online, because you never know if you can save money! You'll be much more satisfied with your purchase if you got a great deal.
So I decided that the picture above doesn't really capture the true colors of the polishes, and I took one with flash that I feel definitely looks truer to the actual colors.

Some close-ups of the colors:


On to the rest!


On top of the Finger Paints BOGO and the red tag clearance, I also used a $5 off any purchase coupon I had, and just to see if I could, I tried to use another coupon code I found at RetailMeNot for $5 off $25 or more--and it worked! I wasn't sure if they would honor that because I'd already used a $5 off coupon, but they accepted it so there's some knowledge for ya!
They also sent me two more coupons for $5 off any purchase of $25 or more. They're always trying to get you to buy more, and it always works! I am so pleased with my purchases and I can't wait to try everything out...stay tuned for videos and photos of my experimenting!
Thanks for reading/watching! I'll see you guys soon!
Thursday, September 27, 2012
A few video links
Hey guys! Since I started my YouTube channel before I started the blog, I thought I'd just share a link to my other YouTube videos so you can check out my first haul video and product reviews.
First haul video:
Product review: Hoofer's Choice Nail & Cuticle Cream
Product review: Nutra-Nail's Bullet-proof Strengthening Formula
Thanks for watching! I just received my most recent package from Sally Beauty Supply, so expect a haul video coming up soon! See you all then!
First haul video:
Product review: Hoofer's Choice Nail & Cuticle Cream
Product review: Nutra-Nail's Bullet-proof Strengthening Formula
Thanks for watching! I just received my most recent package from Sally Beauty Supply, so expect a haul video coming up soon! See you all then!
Galaxy Nails Photo Tutorial
Hey guys! I decided to finally start a blog about my new journey into the world of nail art. So here we go!
I recently tried the galaxy nails I've been seeing everywhere--all over Pinterest and YouTube. This tutorial video gave me the most inspiration so I decided to try it out. I tested out two designs and made a little photo tutorial of the swatching process. Sorry I don't have a video tutorial but I'm limited in video capabilities - I only have my crappy webcam and my iPhone for right now but I'm hoping to get a real video camera soon. Anyways, here we go with the photo tutorial. I hope you guys enjoy this design and give it a try!
Step 1: Gather your materials. For this look, you will need a few colors of polish - try to go for colors you see when you look at pictures of the various galaxies we are aware of. For my look, I chose these colors:
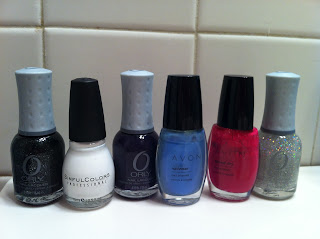 From left to right: Orly 'Goth', Sinful Colors 'Snow Me White', Orly 'Wild Wisteria', Avon 'Lagoon', Avon 'Strawberry', Orly 'Shine On Crazy Diamond'. I also used a base coat (Seche Clear) and top coat (Seche Vite).
You will also need your tools. I used a torn up makeup sponge stuck onto a toothpick so I could have some room to see what my design looked like. I also used a soft plastic card to drop my polish on (I used a discount coupon for a clothing store, but you could use an old used-up gift card or any other plastic item you don't mind getting polish all over)
 You should also have cotton swabs and some polish remover at the ready. Because you'll be using a dark base color, you should clean up as you go so you don't get any stained skin around your nails. Once you've got your materials gathered up, you're ready to move on to step 2!
Step 2: Paint your nails with your basecoat. Allow to dry and then paint your base color. I used Orly's 'Goth', a glittery black, but you could use any black or dark blue you like.
 Allow this base color to dry COMPLETELY. If it isn't completely dry, you take the risk of lifting some of the base color when you sponge on your next color, and that won't look very nice on the final design. I find that applying two thin coats instead of one thick coat will allow the polish to dry much faster.
Step 3: Sponge on your galaxy design's basic shape with white polish. I used Sinful Color's 'Snow Me White'. (p.s. I am SUCH a big fan of Sinful Colors - they're available at most drugstores and they're only $1.99! They feed my polish obsession on the cheap so I love them!)
 To sponge on the design, drop some white polish onto your plastic card and gently dip your torn makeup sponge into the polish, dabbing on the card to take off the excess. Then simply dab the sponge onto your nails in the shape you'd like. I'm fairly uncoordinated so my galaxies came out bigger, but you can certainly make them smaller if you like that look. Allow the design to dry for a few seconds while you prepare your next step--it won't be as wet as a normal coat of polish since it was sponged on.
Step 4: Sponge on your dark blue or purple. I used a mixture of Orly's 'Wild Wisteria' and Avon's 'Lagoon'.
 I chose to mix the two colors because the purple alone was too dark and the blue was too light. To mix the two colors, I just dropped the darker color (Wild Wisteria) onto my plastic card, then dropped the lighter color (Lagoon) right on top of it, and mixed them together by dabbing the sponge into them. I covered my white design with this purple-blue mixture and allowed to dry for a few seconds while I prepared my next step.
Step 5: Sponge on a layer of a lighter color. I used Avon's 'Lagoon', a shimmery light blue.
 Sponge this lighter color over your design. Don't worry if your design is a little rough around the edges or imperfect. When you add your top coat everything will come together, trust me. Allow this color to dry while you prepare your next polish.
Step 6: Sponge on a pink color in the center of your galaxy. I used Avon's 'Strawberry'.
 Concentrate on sponging the pink into the center of your galaxy design. At this point, my pink polish decided to clump up a little bit and I had a few spots that I was concerned about. If this happens to you, don't worry, because again, the top coat make everything come together. Allow this to dry COMPLETELY before you more on to the next step.
Step 7: Add your glitter coat! I used Orly's 'Shine On Crazy Diamond', a clear polish with some holographic glitter in it.
 You could even do two coats of the glitter if you'd like. I got enough glitter onto mine with just the one coat but you could certainly add more if you want it more sparkly. Allow your glitter coat to dry completely, then proceed to the final step.
Step 8: Add your top coat and allow to dry completely. If you've been cleaning up with polish remover in between steps, you shouldn't have much cleanup to do...but if you do, wait until your nails are completely dry and then wash with warm water and soap, then rinse with cold water. Dry with a soft towel and any polish left over on your cuticles and around your nails should just peel right off.
There you have it! The finished product:


If you'd like to see these nails in motion (which you totally should, the pictures don't really capture just how gorgeous this design is), please check out my video on YouTube:
I hope you guys will all give this design a try! I'd love to see your results! Thanks for reading/watching and I hope you enjoyed!
I recently tried the galaxy nails I've been seeing everywhere--all over Pinterest and YouTube. This tutorial video gave me the most inspiration so I decided to try it out. I tested out two designs and made a little photo tutorial of the swatching process. Sorry I don't have a video tutorial but I'm limited in video capabilities - I only have my crappy webcam and my iPhone for right now but I'm hoping to get a real video camera soon. Anyways, here we go with the photo tutorial. I hope you guys enjoy this design and give it a try!
Step 1: Gather your materials. For this look, you will need a few colors of polish - try to go for colors you see when you look at pictures of the various galaxies we are aware of. For my look, I chose these colors:

You will also need your tools. I used a torn up makeup sponge stuck onto a toothpick so I could have some room to see what my design looked like. I also used a soft plastic card to drop my polish on (I used a discount coupon for a clothing store, but you could use an old used-up gift card or any other plastic item you don't mind getting polish all over)

Step 2: Paint your nails with your basecoat. Allow to dry and then paint your base color. I used Orly's 'Goth', a glittery black, but you could use any black or dark blue you like.

Step 3: Sponge on your galaxy design's basic shape with white polish. I used Sinful Color's 'Snow Me White'. (p.s. I am SUCH a big fan of Sinful Colors - they're available at most drugstores and they're only $1.99! They feed my polish obsession on the cheap so I love them!)

Step 4: Sponge on your dark blue or purple. I used a mixture of Orly's 'Wild Wisteria' and Avon's 'Lagoon'.

Step 5: Sponge on a layer of a lighter color. I used Avon's 'Lagoon', a shimmery light blue.

Step 6: Sponge on a pink color in the center of your galaxy. I used Avon's 'Strawberry'.

Step 7: Add your glitter coat! I used Orly's 'Shine On Crazy Diamond', a clear polish with some holographic glitter in it.

Step 8: Add your top coat and allow to dry completely. If you've been cleaning up with polish remover in between steps, you shouldn't have much cleanup to do...but if you do, wait until your nails are completely dry and then wash with warm water and soap, then rinse with cold water. Dry with a soft towel and any polish left over on your cuticles and around your nails should just peel right off.
There you have it! The finished product:


If you'd like to see these nails in motion (which you totally should, the pictures don't really capture just how gorgeous this design is), please check out my video on YouTube:
I hope you guys will all give this design a try! I'd love to see your results! Thanks for reading/watching and I hope you enjoyed!
Subscribe to:
Comments (Atom)